My Family Scrapbook

Wednesday, November 24, 2010

Christmas Is In The Air - Part 2

I promised you the ornament that I also made to try to get into the Christmas spirit. I don't know if this will be my "gift" ornament or not but I generally make 4 or 5 different ornaments and then chose one of those to make for drop by friends or to give family as I see them over the holiday.

This ornament is naturally 3D because of the tea bag folding technique I used and also because you have to make 2 of the medallions and put them back to back so that if the ornament gets turned it is finished on both sides. That is one of my pet peeves.

These are made with squares and single sided patterned papers. You can use more than one patterned paper if you want to but I used 2 (one for each side.) a large brad was also added to the middle of each medallion before I set them together so that there was not a hole or overlap section visible.

Front View:


Back View:


Side View:


The tea bag folding technique to make these can be found on the Internet, just google tea bag folding.

Make a few of these to have on hand for when an unexpected friend or family member drops by as almost everyone puts up a Christmas tree and everyone appreciates a handmade ornament.

Happy Scrappin' ! ! !

Brenda

Monday, November 22, 2010

Christmas Is In The Air

Thanksgiving is just around the corner and I am already planning for Christmas. I have made a few cards and ornaments to try to get myself in the Christmas spirit. By the way it hasn't worked. I am still feeling a little humbug. So a day of shopping is planned for Monday, Tuesday, and Friday. If that doesn't work then the decorating will begin. I must shake the ho-hum feelings and find Christmas!

First a Christmas Card! This card is done with a tea bag folding technique and single sided printed paper cut into squares. Three sizes of squares are needed to make the graduated tree. I also used an embossing template for the back ground, a rectangle for the tree trunk, and a star die to make the topper. Simple thin ribbon is used to accent the bottom of the card.

The great thing about this is that even though you get a 3D effect with the tree because of the paper folding, it lays flat and will go into an envelope for mailing. When taken out of the envelope it fluffs itself back out to be 3D again.


That card is so easy to do and instructions can be found on the Internet.

I will post the ornament in a couple of days.

Happy Scrappin' ! ! ! !

Brenda

Monday, October 11, 2010

Halloween Candy Jar/Luminaries

It appears that I have really neglected my blog... and the truth is I have but not without good reason. There have been many changes in my life and all of them good ones but it keeps me from spending time doing the things that I love doing.

I have many projects to share with you.... most of them are Dies Direct Design Team things but those will have to wait a little while longer. Today I am sharing a project that I did for my CCD/PSR students.

Halloween is just around the corner so I am sharing the Jack-O-Lantern Candy Jars that I made for the kids. These jars are re-purposed glass pint jars that I buy Mayonnaise in. I don't throw them away because I am also a gardener and I reuse those jars to can my vegetables in but for this project I sacrificed a few of my jars to craft with (and I needed the round smooth jars not purchased canning jars.) If you don't have any of these pint jars any round glass jar will work as long as you have a lid to fit the jar.

Supplies that are needed to make this project are:

1) Clean round glass jars with lids (if you don't have lids for the pint or quart jars see #2)
2) Lids purchased from the canning section of your local department store
3) Dark brown or black spray paint for the lids
4) Orange tissue paper
5) Black cardstock or black vinyl
6) Modge Podge Glue from your local crafting or department store
7) Sponge applicator or paint brush
8) Cricut with the "Pumpkin Carving Cartridge" (or if you choose you may hand cut the faces)
9) Raffia or other Ribbon to finish off the piece.
10) OPTIONAL: and I didn't have them so I omitted this - Wine corks for a stem
11) Battery Operated Flameless Tea Light Candles

My finished jars have a brand new candle in the bottom and then are filled with candy for the kids. When the candy is gone which should take about a heartbeat to happen they have a Halloween decoration for their room or that they can give mom as a gift.


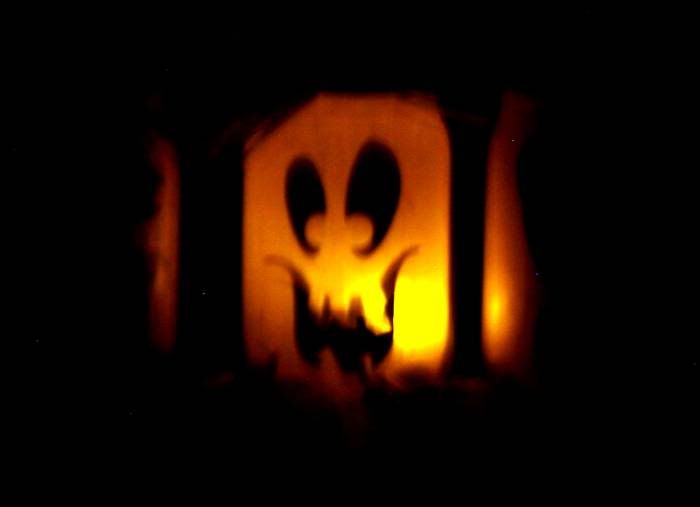
The possibilities for these are endless because they can be made into Frankenstein, a Mummy, Dracula, a Witch or countless other Halloween characters.

These don't have to be limited to giving to a child either, adults love them as well. I am going to make a few more and line my sidewalk with them for Halloween night to welcome my Trick Or Treaters.... I just hope they leave them so that I can use them for the years ahead and that they don't steal them. A chance I am willing to take.

Happy Scrappin' and Crafting!

Brenda

Monday, July 12, 2010

I Was Inspired!

Some times a die will lay on my scrap table begging me to use it. I have to be inspired and need the right project to use it on.

I love the Dies Direct "At The Beach" die but I did not have any pictures that were water or beach themed. I can't tell you the last time that I went to a beach.

A friend of mine is always using the term "Is it beer thirty yet?" Which always makes me laugh. She does that when she is tired of being at work and is ready for home. Well I am always telling her "it's five o'clock somewhere! One day we had the exchanged and a little light bulb went off and I could not get home fast enough to see if these dies would work for this idea and low and behold they did.

So I am sharing with you the "It's Five O''clock Somewhere" Clock!

I used the following dies: G42 Grunge Ovals, C143 At The Beach, FS109 Optimistic 3/4 Font, FS107 Optimistic 1/2 Font.


This was a fun and easy project to do and I had to laugh when I got it done because of the way the project came to be. (And how my daughter tried to take this and keep it for herself!)

Sometimes you just have to let loose and have a conversation with a friend in order to be inspired.

Happy Scrappin' ! ! !

Brenda

More Little Gifts

My husband's office decided that it was time to show everyone in the office how much they are appreciated, because let's face it, without the office help the receivables, pay outs, pay checks, and tax forms would never get completed.

Each of the techs were asked to bring in one small gift for an office girl and they would put all of the gifts in a hat and let the girls blindly chose a gift. These gifts should not be expensive, just a little something to tell them "Thank You" for a job well done.

I was stumped at first but then told my husband that I would make an old stand by. He agreed and I made 5 of these (because Jr. Legal Pads come in packages of 5.) He took one to work and then I have extras for other little gifts.

These are nothing more than a folder made from cardstock with a Jr. Legal Pad adhered to the inside and on the opposite side of the fold a triangle to form a pocket for business cards or receipts.

To decorate the front of the folder and the inside pocket I used the Dies Direct Daisy Chain Border Die. This die can be used single (as on the pocket) or doubled as on the front of the folder.


These make wonderful teacher gifts as well.

Happy Scrappin' ! ! !

Brenda

Friday, July 9, 2010

Crossword Puzzle Time

Dies Direct out did themselves with the Lattice 1 Die!

I love this die and it just reminded me of the small blocks on a crossword puzzle or the spots on a Scrabble Game!

I decided while I was making Birthday Cards to see if their smallest font, the Micro Mini Font, would fit inside these blocks... and they do! That made the wheels turn a little bit and then I wanted to figure out which sentiment to use. It didn't take long to find out where to place the letters and then I needed some small hearts and their Mini Book provided the perfect sized hearts!

This was a lot of fun to make and could be made into any sentiment for any occasion.


You are only limited by the number of squares and what you want to say!

Happy Scrappin' ! ! !

Brenda

Wednesday, July 7, 2010

Looking At Things A Little Differently

I can't leave things alone and when I get a new die I want it to be able to be used in many ways or for something other than what it was intended for. It makes the die more "valuable" to me.

When I looked at the Large Window Grid from Dies Direct I saw a Tic Tac Toe Board! I wanted to play! So I did...... with just a few snips of the scissors not only did I make a travel Tic Tac Toe Board for my nephew too play with in the car. I also made this card. X's and O's scream love and I don't need a reason to tell someone that I love them. So when I gave him the Tic Tac Toe Game I made a card to go with it.

I didn't take a picture of the game but it is all magnetic so that the pieces wont' get lost and small tin make not only a great back for the game but also a great storage container.

I used: Large Window Grid (FRM 113), Optimistic 3/4", and Optimistic 1/2" Fonts.

The front of the card:


And then the inside of the card:


Have a little fun with symbols and find a new use for some of those dies.

Happy Scrappin' ! ! !

Brenda

Monday, July 5, 2010

Happy Birthday Card

Seems like every time I turn around I need a Birthday Card so I am trying to make a few to have on hand. It seems like everyone looks forward to the handmade cards these days.

For today's card I used the Dies Direct Large Window Grid. This die is an A2 size and is perfect for a card front. I used a pair of scissors and with just a couple of snips had a place for my sentiment (and that sentiment could have been anything!) I completed the card with purchased flowers sprayed with Glimmer Mist and half pearls for the center of each. (Easy as pie and faster to make!)


Whip up a few cards in advance and use what you have on hand.

Happy Scrappin' ! ! !

Brenda

Friday, July 2, 2010

Summer Is Here - But My Mind Says Spring

I am longing for the weather that we had in April and May. I love that time of year when it is cooler outside and the Spring flowers are blooming. Since I am in that frame of mind I am also scrapping that way as well.

I am sharing a card today that once again uses some of the Dies Direct new dies. (I would use some QuicKutz but there aren't any new ones to use!)

For this card I used: Lattice2 (frm115,) 2x3 Pretty Petal (A166,) and Bird on a Branch (A168.) The die cut "Spring Has Sprung" is done with a computer program that I own called Make The Cut that works with my Cricut Machine and that is my own handwriting.


This card could be made with any sentiment on the front... from "Happy Birthday" to "Thinking Of You." I have a bunch of Boss Kut Dies and even a few of the QuicKutz Sentiments Dies that would would be perfect.

Happy Scrappin' ! ! !

Brenda

Wednesday, June 30, 2010

A Little Late - But Better Late Than Never

I ended up making a second Father's Day Card (the day before Father's Day) because each of my kids needed a card and neither had the time to make them.

Previously I posted one of the cards and just to show you what I did. The die I used on the front of this card is a custom die from The Scrapping Cottage. All of their "Cottage Cutz" are manufactured by Dies Direct. That is what Dies Direct really excels at! (The owner of Dies Direct used to make all of the QuicKutz and Spellbinder dies before they took their business over seas.)

The die that I used is the Bait Shop Die. This is 2 - 4x4 dies and there are lots of little pieces to this but a with a little patience and time it makes a beautiful piece. I love this. I used an exclusive QuicKutz die (the scalloped A2 Rectangle - available at Archiver's) to back the shack. Of course I also used some ink to distress the piece.


For the inside of this card I used the Karen Foster "Giddy" Font. (These small dies work in not only the little Karen Foster Tool (which I do not own,) but also in the Big Shot, Epic 6, and Boss Kut machines.


While I was making the card I made a second Bait Shop to use later on the Father's Day Lay Out or on one of his fishing lay outs.

So while you are making a card for that special someone, think ahead and make two of a die (especially when there are lots of little bitty pieces) for future use.

Happy Scrappin' ! ! !

Brenda

Monday, June 28, 2010

In "Baby Mode"

So many friends and family are announcing new arrivals so that puts me in "baby mode"

A little gift here and a little gift there. So I made several of these 3D baby frames to have on hand. The frame is a dollar store frame that I have emptied and painted with white and then sponged with shiny acrylic dry paint. I then used some of my Dies Direct dies to make a 3D picture that the parents can either hang on the wall or easel on a table or dresser. All of the items in the frame are pop dotted so that they stand out.

I used the following dies: Grunge Series (G42) Oval Frames, Rocking Horse (C108), and Grunge Frame Series (G40).

I also used a little bit of Tim Holtz distressing ink and a white gel pen.


Like I said I made several of these in various colors so that it could be used for either a boy or a girl. I am only showing you one example.

My challenge today is that you pull out some of those dies (or order some new ones) and make a few gifts ahead of time.

Happy Scrappin' ! ! !

Brenda

Friday, June 18, 2010

Take A Message Please

I have seen these little message centers all over the Internet and I love them. I have seen them done as calendars, with a Post-It Notepad, and also accented with pictures. I've always wanted to do one but never had the die that screamed "message" until Dies Direct came out with a new die called "Message In A Bottle."

That was all it took for me to get out that dollar store acrylic frame and get to work.

I cut a piece of cardstock the size of the frame, decided where the note pad should go, and then the die came to life. I also used the 3/4" Optimistic Font. A pen that can be taken apart so that a small cylinder of cardstock can be inserted so that the pen matches the scene pulls it all together. Now the secret to this is that the artwork goes in the frame and the note pad goes on top. I used a Crop-A-Dile to punch a hole in the back of the frame to attach the pen.


These are cute gifts to welcome new neighbors, for teachers, bosses, or secretaries OR you don't have to have a reason make it a "just because" gift. While you are making someone else one make yourself one as well and put it by the phone so the teens have no reason to say they forgot to take a message.

Happy Scrappin' ! ! !

Brenda

Wednesday, June 16, 2010

Father's Day and Fishermen

There are two things that my family loves, a celebration and my men love to go fishing. This next weekend they will have a little of both. It is Father's day on Sunday, June 20th. I can't believe that the year is half over already.

Father's Day, at my house, always means a BBQ and that the men will get up at the crack of dawn and go to their favorite fishing hole. When the men get home we will fire up the grill and country ribs will go down, they will drink a couple of cold ones and gifts will be given.

I have busy making the cards, which is what I want to share with you today.

I took a different approach to my cards this year and incorporated the fishing theme into them. Dies Direct had the perfect embossing plates for this. These are new plates and they work flawlessly. After embossing the image from the plate I grabbed a grunge plate and tore the edges and then inked the edges and the image for some distressing effects. I layered the embossed cardstock on a printed fish paper and then that onto a card blank. I left the inside blank so that the kids could write their dad a personal note. A gift card to Cabela's and Bass Pro Shop complete the gift!


Throw a themed Father's Day for the big daddy in your life.

Happy Scrappin ! ! !

Brenda

Friday, June 11, 2010

Family News

Normally I don't post family news on my blog, but this has a crafty edge to it so I am doing it.

On May 11, 2010 my sister-in-law, Susie, and her husband, Shannon blessed our family with a beautiful baby girl, Karen Rosemary. She weighed in at 4 pounds, 9 ounces and was 17 inches long. She was a little early but perfect in every way.

Here is a picture of Baby Karen with her parents and then one of just her (these were taken on May 12.


Susie's girlfriends gave her a shower and I was still working on her real gift so for a shower gift I gave her a diaper wipe warmer, which I think every baby deserves! I continued to work on the crocheted afghan and got it finished just 2 days before Karen came into our lives. Susie did Karen's nursery in pinks and browns with a butterfly motif theme. This is the closest thing I could come up for her themed nursery. They seemed to like it.


So today I don't have a scrapbooking challenge for you (those pictures of baby Karen and her momma and daddy will be scrap-booked but it may be a while before I get to them.) I just wanted to share this wonderful news and show off our new family member and another craft that I do.

Until next time Happy Crafting ! ! !

Brenda

Wednesday, June 9, 2010

So Much Has Happened

My last post was around Mother's Day. Wow time really flies. I guess I should be more faithful about getting posts up and keep everyone informed.

I am going to show you a few projects that I made and sent in for the Dies Direct Design Team. These don't really have any rhyme or reason as to why I am using a snowflake or Easter Bunny die in the middle of summer other than I was sent the dies and wanted to use them.

The first project is a candle. I used the Dies Direct Snowflakes, along with 2 colors of tissue paper. After I cut the tissue into shapes I used a regular blow dryer to slightly melt the outside of the candle, working quickly place the snowflakes on the candle and then melted the candle again so that the wax engulfed the tissue paper and it became part of the candle. This is very easy to do and you can make several at one time.


The second project is a basket made from a 9x9 inch piece of cardstock with a 1 1/2 x11 inch piece for the handle. The 9x9 is scored in thirds both ways, and then cut 1/3 in on the score lines on opposite sides. One brad on each side holds both the basket sides and handle into place. Then it I used the Dies Direct Pretty Petal 4x4 die for the 3D flowers around the edge of the basket.


The third and final project for today is a 6" metal bucket that I used the Dies Direct Bunny in a Basket and a product called Modge Podge. I first prepared the bucket with alcohol inks, then cut the pieces to the die cut out, used various inks and chalks and the assembled the die cut, coated one side of the tin with the Modge Podge, added the die cut to the tin and then coated the entire piece with Modge Podge two more times. This piece can be cleaned with a damp rag and would be a little more child friendly. This would be perfect for a child's mini Easter Treat basket.


I hope that you will check out the Dies Direct Website as they are coming out with new dies everyday.

I will try to have a few more pieces to show you soon. Dies Direct has some really cool new products that I just got my hands on a couple of days ago and the wheels are turning and I am itching to scrap some of the things that I immediately sketched.

Happy Scrappin' ! ! !

Brenda

Friday, May 7, 2010

Mother's Day Already?

To my mom - Happy Mother's Day and to all of you out there are Mom's as well.

I've said it before and you will hear it time and time again, I am 3 years behind on my personal albums.... and I am trying to do a little here and there as I can. I am always so busy though that I just keep getting farther and farther behind.

With the help of Susan at the ScrapyLand Blog and her Starting Blox, I threw this lay-out together in no time and I love the finished result. This is a picture of my mother-in-law, Karen, who has since passed away and my own mother who since this picture was taken has struggled with getting well after suffering some bone crushing injuries as a result of a car accident. She is now doing remarkably well.

I used several techniques/products to get this lay-out finished. I used my Gypsy to make the scalloped circle that I cut in half and used a piece on each page. (I hate paying $1.50 or more for one of those specialty shaped papers when you can make your own for the price of a 12x12 piece of cardstock.)

I used a new program called Make-The-Cut to cut out our mom's names. I am still learning how to use that program but so far I love it. It allows you to cut any True Type Font, that you have stored in you computer, using your Cricut Machine.

I used only one QKs Dies, the font is Stardust Cookie Cutter. A Martha Stewart punch set was used to make the lacy doily and a Dies Direct Pretty Petal die was used to make the flowers.

This first page is my Mother-In-Law:


The second page is my mom:


This is a view of the two pages side by side (I used the same starting blox for both pages but flipped the design on the second page.)


I am hoping to scrap more in my personal album in the coming weeks. I just have to get motivated.

Happy Scrappin; ! ! !

Brenda

Wednesday, May 5, 2010

Happy Cinco De Mayo

I have to admit I don't celebrate Cinco De Mayo but a few years ago we went to our favorite Mexican restaurant and it happen to be May 5. So I took out my camera and shot a few pictures since everyone was celebrating. I think my camera got passed around because there are even pictures of me, which almost never happens.

These pictures are from 2007 so I am exactly 3 years behind on my personal scrapbooks.

I took a Starting Blox from Scrapyland.com's Blog and used that as a guide and then used several of the dies that I bought from the ScrapLand.com store including the Paper Doll (and I also used the boy hair and boy clothes,) Mexico Collection, 4x8 License Plate Font, Triangles (Retired,) QK Tangerine Classic Font (retired,) and then I also reached for a Dies Direct set called Optimistic 1/2" Font, and I also reached for a stamp set from a company called Peachy Keen.

Every one of those peppers is two pieces and layered. The triangles are also each cut and layers.


To pull the two pages together a few peppers found their way on to this page.


I have to say I love the way my little Mexican dude turned out,


I guess even holidays that aren't holiday's in the U.S.A. can be celebrated. So with that I will say Happy Cinco De Mayo and let it go at that and my challenge is that you carry your camera with you because you never know when a holiday might present itself.

Happy Scrappin' ! ! !

Brenda

Saturday, May 1, 2010

Rich In Tradition

Sometimes a holiday isn't a holiday at all. Sometimes a holiday is a memory of a tradition that has been passed from generation to generation. You don't hear of May Day very much any more nor do you see the little signs of May Day sitting or hanging on a door but I still love to surprise a few people (family, friends, and neighbors) with a little something to keep May Day alive.

For me, today is all about my mother's memories. She tells stories of her childhood, making a little basket and picking wild flowers and weed flowers, putting them in a little basket and adding a piece of candy or two, knocking on neighbors doors and running to hide to have the person answer the door and a little treat being there.

As a child my mom would help us do this to our favorite neighbors, Mrs. Zoe Witt and Mr. Gus "Doc" Greer and others. Those two would come looking for us because they would see us going back into the house laughing. For me, this day also brings back very fond memories of those two neighbors.

I always remember the stories that my mom tells and then think back to how much fun it was, as a child, to do this. So a couple of weeks ago I got busy and dug out some dies and made a few little door hangers for my family, friends, and neighbors but I did not add the candy nor am I going to ring bells and run. Early this morning I walked the neighborhood and left the little anonymous hanging cards on door knobs and then drove to my mom's to leave her one. Twelve little gifts in all were left and a feeling of happiness will stay with me all day thinking that I might have brought a smile to their faces and reminded them of childhood memories.

Here is what I left them:

This is the hanging card open:


On opened and one closed and tied with a ribbon:


A this one hanging on my bedroom door just to make sure that it would hang on a standard door knob.


I do not know where May Day originated, what culture welcomed spring with gifts for those you are fond of, but it brings back some wonderful memories of my mom and of my own childhood.

So I challenge you to make a little something for a friend, family member, or neighbor, if for no other reason than to brighten their day!

Happy Scrappin' ! ! !

Brenda

Wednesday, April 28, 2010

Honored To Say Yes

Recently I was able to attend CHA and represent a company called Dies Direct. Months have passed since I traveled to Arizona to meet them and travel on to California to CHA. During the time that we were preparing for CHA I used some of their dies to make cards for the booth. I posted them previously here on the blog.

I was recently contacted by BJ, one of the owners, and invited to sit on their Design Team. I accepted the position and I have recent received a box of their new dies. Can I just say I am blown away by some of the new designs.

When I opened the box the first one that caught my attention wasn't a die at all, it was an embossing plate. The thing that is unique about their embossing plates is that they are two sided so you get a little more for your money.

I could not wait to play with this plate. First embossing with it and then sitting down and colorizing the image. This is what I came up with:


This will make a beautiful card for Mother's Day or a Get Well Card.

I hope that you will take time to go over to the Die Direct website and look around. They have a line of dies, grunge plates, double sided embossing plates, and accessories.

Happy Scrappin' ! ! !

Brenda

Monday, April 26, 2010

A Baby Shower

My sister-in-law, Susie is expecting her first baby. We are very excited about a new family member coming into the world. She is due the first part of June and last weekend I attended her shower.

I got the gift ready and I had forgot to buy a card.... Oh My a scrapbooker by a card? Yes when in a hurry I still buy a card but I did not want to go back to the store to get just a card so the morning of the shower while the house was still quiet I got out a few dies and made a card.

I just started reaching for things like my Spellbinder Nesting Circles, a Go-Kreate Baby Die, and the QKs Banana Split Font. (All of those dies can be found at ScrapyLand.com.) Now I know that they used to carry the Go-Kreate dies and he still has a few of them there but if I am not mistaken that company is no longer in business so there are limited dies from them. I also used a Peachy Keen stamp for the baby's eyes which I purchased at a local scrapbook store called The Scrapbook Factory. I love that store as well and they just started selling on-line.

In any case this is the card that I whipped up in a matter of 15 minutes.


You may have guessed the baby is a girl and they have chosen the name Karen to honor my Mother-In-Law who recently passed away. I know that she is looking down from heaven admiring everything that Susie is doing.

I need to make more cards instead of buying them if for no other reason to put my investment to good use.

Use those dies and save the money you would have spent on a store bought card for more dies!

Happy Scrappin' ! ! !

Brenda

Thursday, April 22, 2010

More Cards

As many of you have heard me say, "I am not a stamper." I have collected a few stamps and a few Copic Markers and I do play with them. I enjoyed it and I have to say it was like being in art class all over again. Learning how to blend colors and what colors blend best with others.... a real challenge.

A few weeks ago I made a card with the "Rock The Farm" Greeting Farm Stamp from ScrapyLand and since then I decided to do another one very similar to the first but then the little girl also looked lonely so I did one with her as well.

This time I used the new QKs Nesting Scalloped Rectangles. These dies are made for the Epic 6 machine and I purchased the dies at Archiver's. There is one in the package that is the perfect size for the A2 card.


The inside of that card is the same as the other card from a few weeks ago but I used the same nesting rectangle as on the front of the card.


Now for the other stamp in that package. She is a cutie and I used her in a similar manner that I did the boy a couple of weeks ago but added a few little heart accents to the front of my card to carry over the heart patterns in the stamp.


Then on the inside of the card, for a little contrast instead of using the Oval Spellbinder dies as I did on the front, I used the QKs nesting rectangle again.


I had a good time making these cards and experimenting a little more with the Copic Markers and using my new nesting QKs Rectangle dies.

If you are buying something new make sure is it versatile enough that you will use it for more than one project and that it will carry over from card making into scrapbooking.

Happy Scrappin' ! ! !

Brenda

Saturday, March 27, 2010

Is It Really Time For Easter Already?

The weather is starting to warm, spring bulbs have came up and the frost nipped them, spring rains have started to fall, and then temperature is up and down. All of those things point to the fact that is Springtime outside and Easter is quickly approaching.

Many of you have heard me say that I teach a CCD/PSR class. This year I have six of the most wonderful Kindergartners. I love these children. They work hard, do what is asked of them, never complain, and if I give them a homework assignment they complete it without complaints. These children have also memorized all of the required prayers and now it is time to celebrate their accomplishments.

I made Easter Baskets for them this year. These were made with the Cricut and the Easter 2010 Cartridge. (Even the little eggs on the side of the baskets are on the cartridge. )

I made 6 of them (4 bright lime green for the boys and 2 hot pink for the girls.) Each basket has a large clear character egg filled with Sixlets, Smarties, a wired movable bunny, a tube of bubbles, a Lg. Reese's Peanut Butter Egg, a flipper frog, and a Ring pop. (That is a lot of stuff layered and packed into that small little cardstock basket! There is also a small handful of the colorful shredded paper.


I took these pictures before I wrapped them with the clear cello plastic. I thought it would be easier for the kids to them home if they were covered. It worked really well. I also took pics first because I thought that the camera would "glare" after wrapping them with the plastic.


These are small baskets each made with one sheet 12 x 12 piece of AC Textured cardstock. I thought they would be perfect (just a little something for each student to let them know that I thought about them at this very special time of year.)

I was always taught that it is not the size or price of the gift that matters it is the thought. I put a lot of thought, but very little time into these baskets. They were inexpensive to make and something that I am very proud to give as a gift. I know they will not last long because after all I am giving a paper gift to 6- 6 year olds.

I sure hope they like them and I hope that I've inspired you to make one or two of these to give to children you know.

Happy Scrappin' ! ! !

Brenda