My Family Scrapbook

Monday, December 24, 2012

Heart Candle Base With Charms

This will probably be my last post until after the New Year. This also concludes the items that I have made for Christmas gifts. I made two of these heart candle bases with matching charms. One of them is going to my husband's brother and his wife, and the other to his sister and her husband. I just could not come up with a gift idea for them so I made them something and purchased the candle to go with it.

I am not going to get long winded on this post but rather get right to the wood working.

Here is a picture of the just the base:


And here is a picture of the candle on the base with the charms tied to it with jute:


I hope that they like them as I put a lot of time and effort into these.

Happy Crafting ! ! !

Brenda

Friday, December 21, 2012

Quick Gifts - Change Of Pace - Sewing

I needed a quick and easy little something to give as a gift. This was more or less to fill in and make my gift look a little bigger. I had previously posted that I made each of the girls in my office a wooden trivet.

I did a little research after seeing these towels at a local craft bizarre. I found a great step-by-step tutorial on you-tube.com and having some sewing experience these looked so easy.

Materials were inexpensive, readily available, and I had some of the supplies on hand such as thread and buttons. My materials list was potholders with a loop on the side and they could be round, square, or rectangle. Matching or coordinating kitchen hand towels, color coordinating buttons, thread and of course my sewing machine.

Here is a the LINK to the you-tube tutorial. You will find that the directions that the girl gives are very easy to understand.

Here is a picture of my finished hanging towels that will be given with the hand made trivets.


Just a quick share of another craft that I enjoyed making and would like to get as a gift myself.

My motto is always give something that you would like to receive.

Happy Crafting ! ! !

Brenda


Tuesday, December 18, 2012

More Bottle Cap Ornaments

I spray painted way too many bottle caps white when I was making the snowflake face snowmen, so with that in mind I decided to surf the web to see what I could find to make with white bottle caps. I didn't have to look to far. I went as far as Pinterest. That site is a wealth of pinned items that people have found on the Internet.

I found an ornament using 3 bottle caps that were glued to a a ribbon but the bottle caps were inverted and harder to work with, so with a flip of the cap I had a smooth surface to work with. Here is a link to that original snowman ornament.

As in my previous post with the snowflake ornaments, I had some crafting supplies that allowed me to stamp the faces for the snowmen. I love that little face!

Instead of using a ribbon, I drilled holes in the bottle caps and used jump rings to attach one to the next. I also made some plain as in the original that I found on Pinterest, and I made a few dressed up by adding ribbon and snowflake buttons and a few with each style of face.

Here are my finished ornaments:


It amazed me how a little piece of ribbon and a button dressed these up.

So next time you prepare more of an item that what you can use for one craft, do a little searching to see what else you can make using that item and double up your productivity.

Happy Crafting ! ! !

Brenda

Friday, December 7, 2012

Gift: Clover Candle Base With Charms

Today I am sharing a gift that is partially hand-made and partially store bought.

The wood base with charms is a pattern that I purchased when I ordered my wood. I purchased 2 patterns (one with clovers and one with hearts)  for these candle bases.

This first one is a Christmas gift  for a very special couple (my son and his wife.) My son is very proud of our Irish Heritage and I wanted to make something that they both would like. Kim, my beautiful daughter-in-law, loves candles.

This has many hours involved and the cuts became tedious because progress was very slow to see, BUT, the I really love the end result.

Also a side note for this project, I did not follow all of the directions that came with the pattern because I did not understand them. I do now because of the wonderful men and ladies at the wood working message board. I am exploring and going to try the self-framing method, but for now what I did worked and gave me more practice with my router.

Here is a picture of the candle base:


Another photo of the edge so you can see the router work on the edge:


And one last photo of the finished piece with the candle in place. I used jute string to tie a decorative bow and hang the charms from the stings.


One of these days I will make myself one of these. I have yet to make myself anything.

Happy Crafting ! ! !

Brenda

Thursday, December 6, 2012

Snowman Face Ornaments

Today I am switching gears and posting  a craft item that is not made of wood.

I have an abundance of crafting items laying around and decided to play with some of my scrapbooking and paper crafting items BUT not on paper! I forget the mulitude of items that I buy for one purpose and then find other uses for them.

I have a box of the cheap, glitter, plastic snowflakes that you can buy in any dollar store, craft store, or Wal-Mart. These come 20 to a box and I actually found mine at a resale shop. They were new in the original packaging and sealed.

I also used some old bottlecaps that I have had in my stash for years and never had any idea what I would use them for but loved them. These were sent to me in a swap.

The stamps that I dug out of my scrapbooking supplies were part of a die cut set that I purchased from The Scrapping Cottage. I love their products! Here is the LINK for the die set that I used. The snowman's pipe on the face is not on the stamp (which I love even more!)

Other materials I used were spray paint to make the bottle caps white, Copic Markers to color in the nose and to pink the cheeks of the snowman face. Stickles to glitter the edges of the bottlecap so that it pulled the piece together. I also use the clear Aleene's Gel glue to adhere the bottlecap to the snowflake.

It took more time waiting for the paint to dry on the bottlecaps then it did to stamp, color and put together 12 of these.

Here are the two differnt ornaments that I made:


These only cost pennies to make and the little ones on my gift giving list will love these! I plan on using them on packages along with the bow or ribbon.

Just something new to do with all of those tucked away scrapbooking or paper crafting items.

Happy Scrappin' and Crafting ! ! !

Brenda

Monday, December 3, 2012

Now For A Few Home-Made Gifts

I have already showed you the "trivets" and ornaments that I have made for gift giving. Now it is time for just a couple of other gifts that I have made and I am planing on giving.

I am showing you just one today. This gift has already been given back in September.

It was the first thing that I gave away. It seemed like it took me forever to make but that is because I would get tired of working on it and would go between making ornaments and working on the basket. I think that was because of the amount of sanding that was involved in this small project. I did not like the squareness to the cut and I took time to round each band of the basket so it looked more like a natural basket.

I was amazed at how these baskets are made. It took me a little while to put my mind around the process. A bottom solid piece, 5 rings, a finishing ring, and a handle. The handle turned out to be the trickiest part of the entire process!

I liked the end result! I filled the little basket with candy, put some netting around it and gave it as a wedding gift.

Here is the picture of the finished basket. It is small, only about 7 inches from the table to the top of the handle. It was very light in weight. I cut it from 3/8" pine and stained it in natural stain.


I would also like to share a couple of pictures of the couple that I made this for:


I hope that the happy couple have many happy years!

Brenda ! ! !


Wednesday, November 28, 2012

Ornaments in 3D

As I progress through learning this craft I want to try new things and different techniques. I don't want my new hobby to get stale and I don't want to become board. (No pun intended but you have to admit that was funny.)

Not everything is flat or lifeless. Many projects have movement and/or dimension.

Today I am sharing the 3D ornaments and one that has some movement to it.

This first one is a free pattern that I found on a magazine site that I have to tell you I love! There is a message forum there that you can post issues, pictures, or visit with other wood artist. This site has been a wealth of information for me. With it's many tips, tricks, and many how-to and free patterns this has turned out to be one of my favorite sites. The site is for 
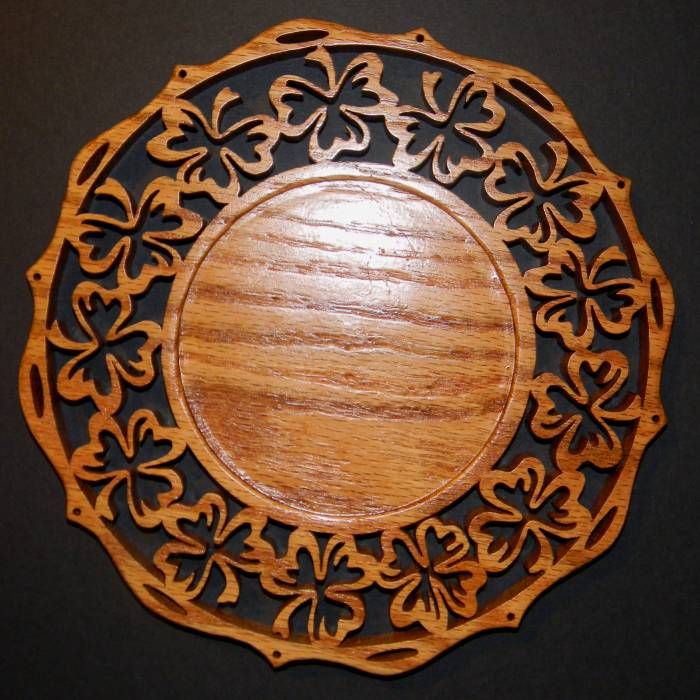
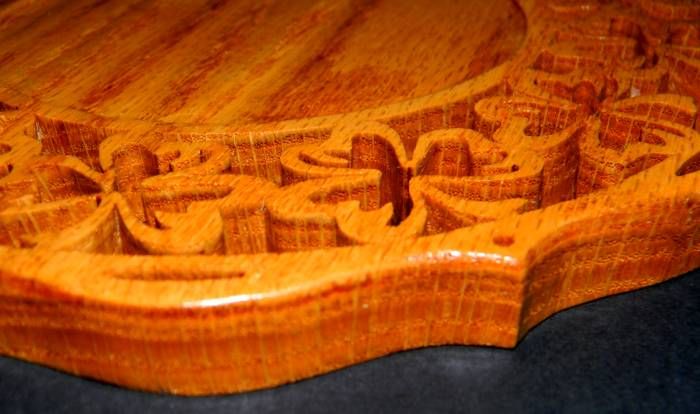
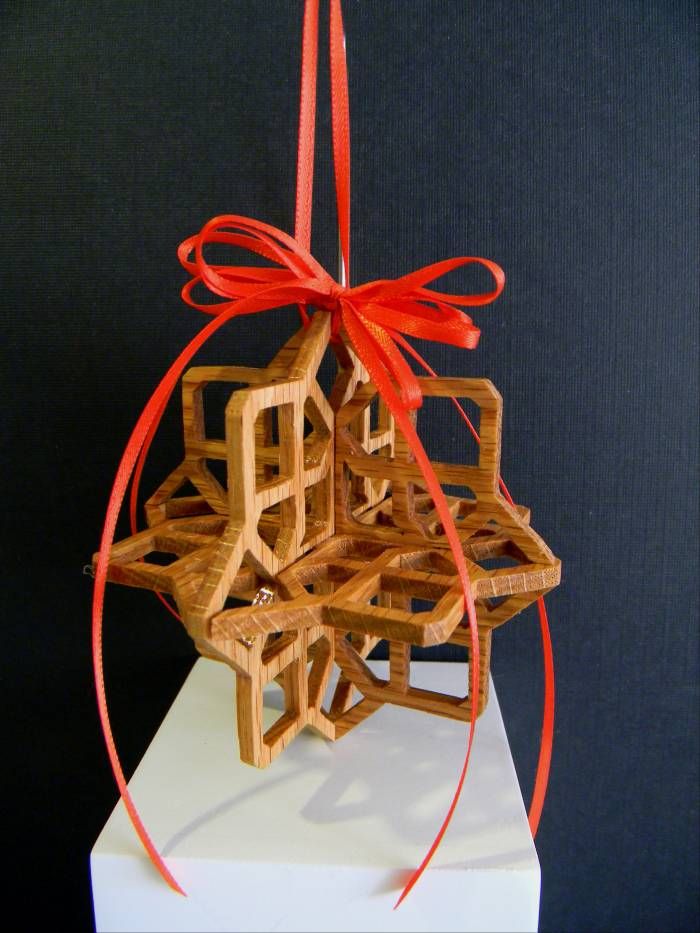
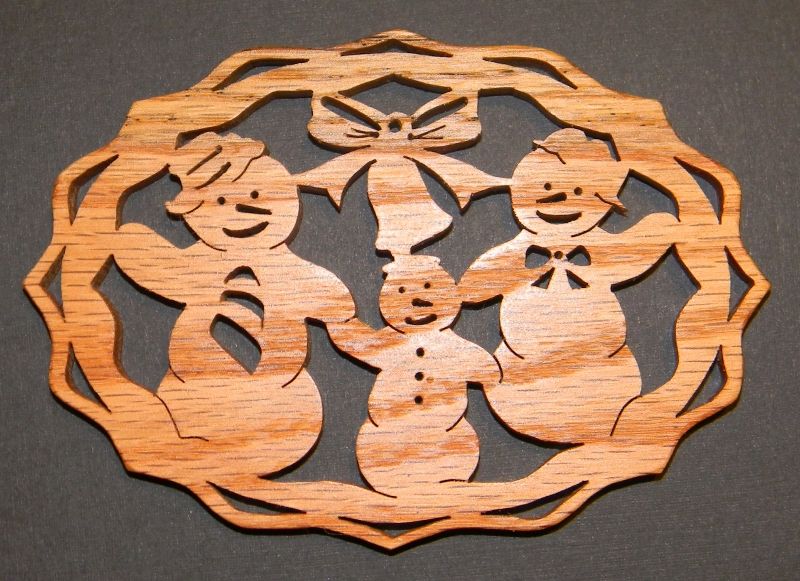
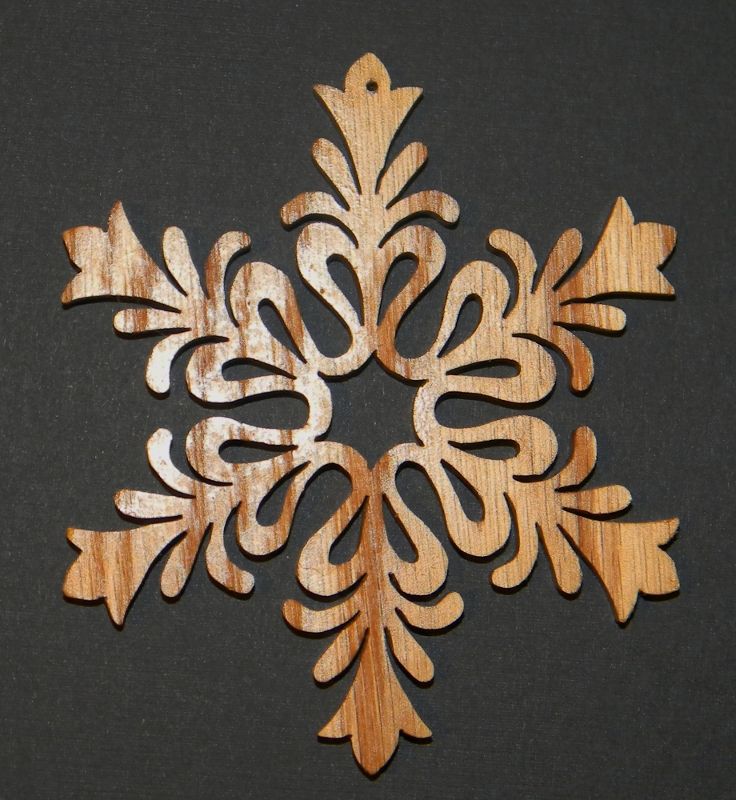
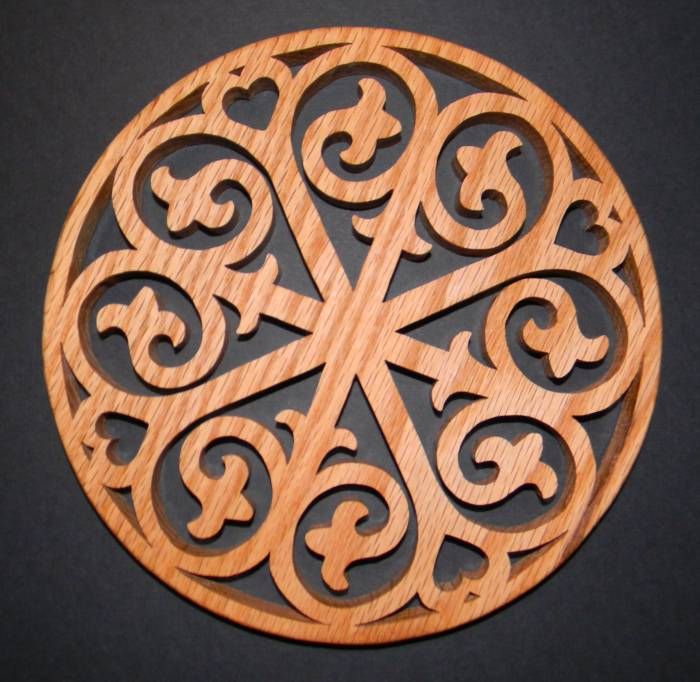
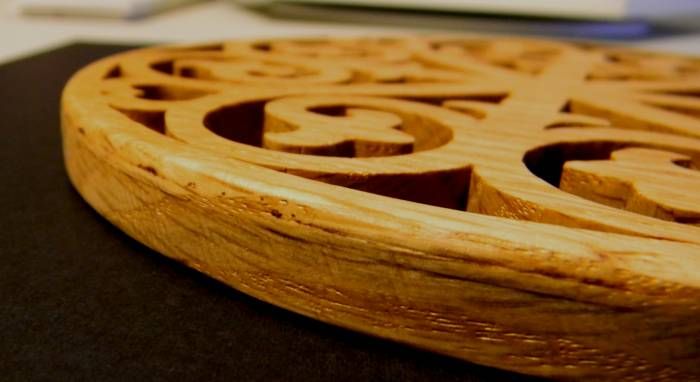
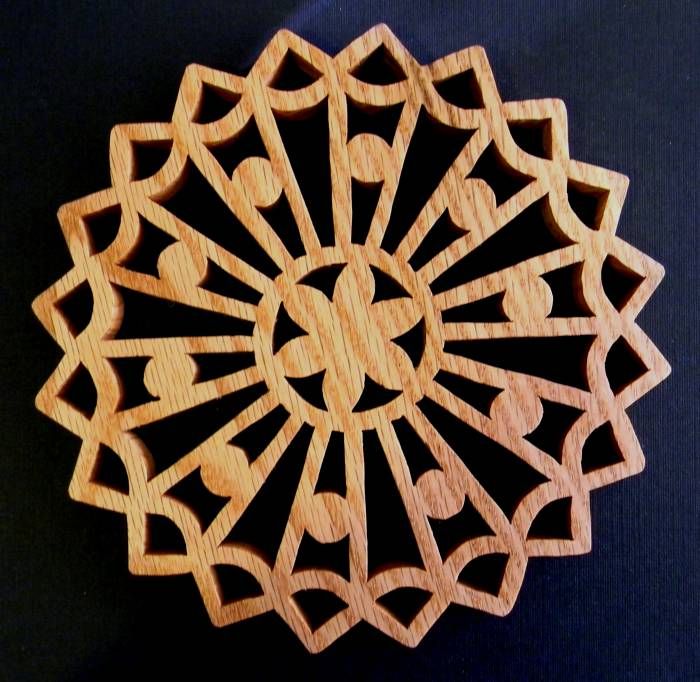
Scroll Saw Woodworking & Crafts. Here is a direct link to this first 
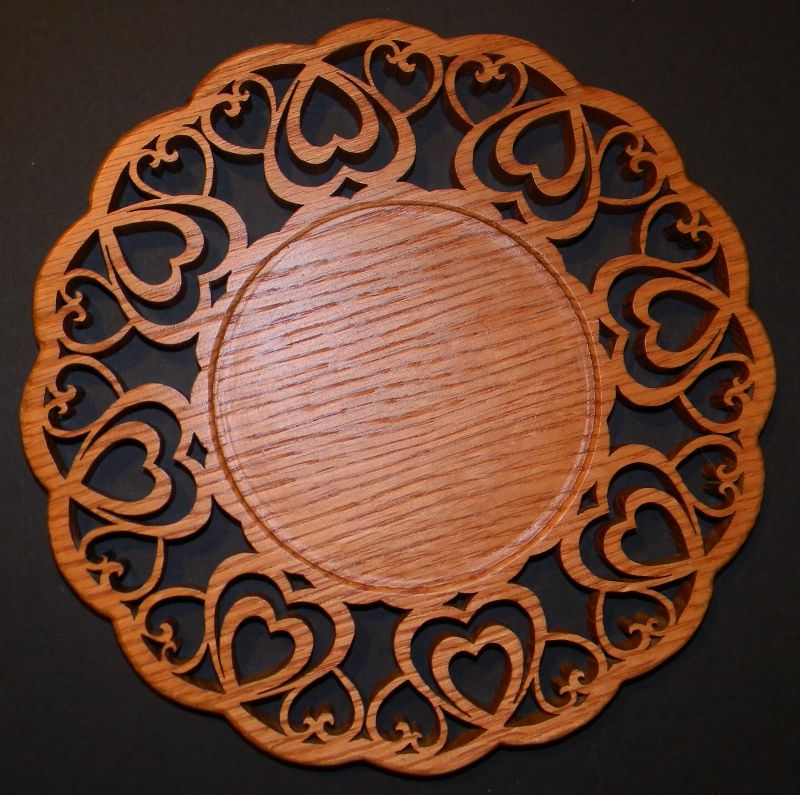
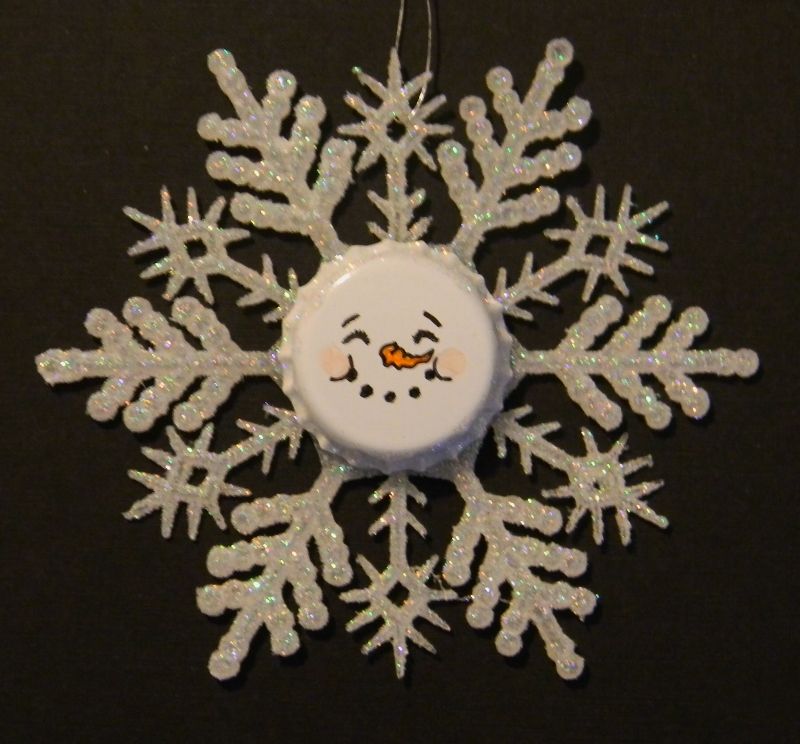
3D "snowflake" ornament. I used red oak, finished in natural, and the finished size is approximately 4 inches.


Did I mention I have made a few friends there as well. Everyone at that site are very kind and when I posted my very first project no one laughed at me, they encouraged me! (And that first project wasn't awful but it also wasn't a prize either!)

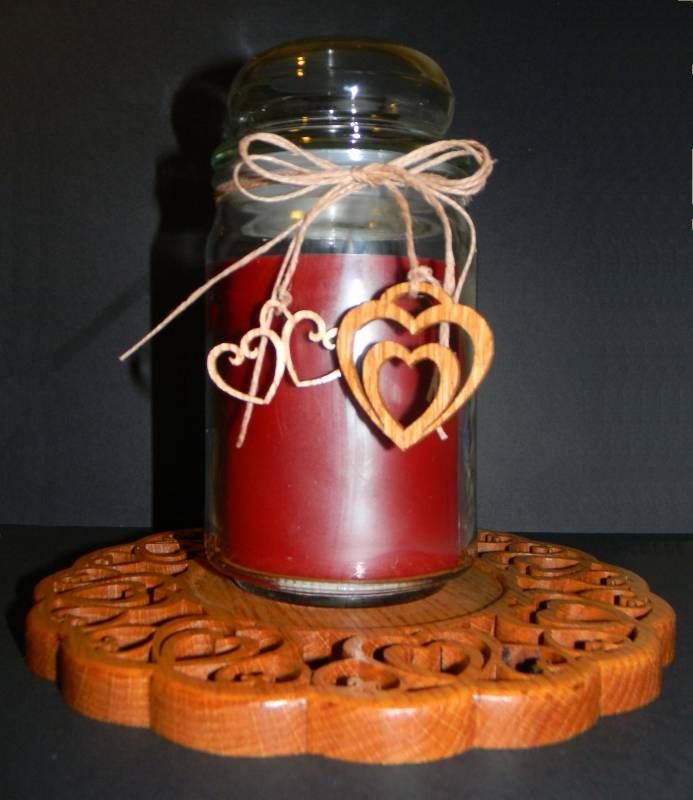
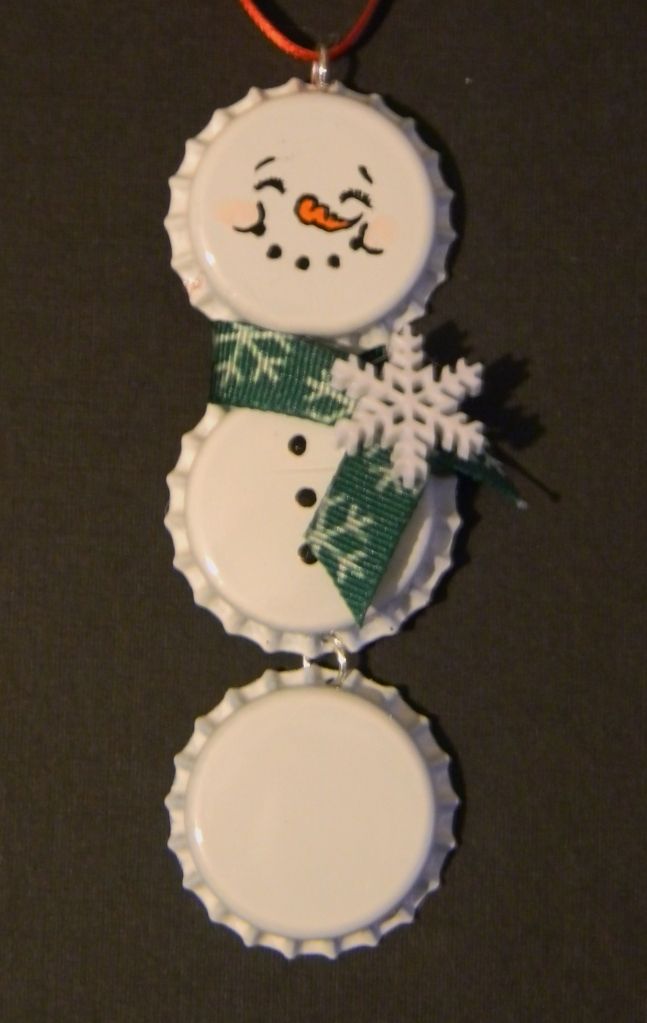
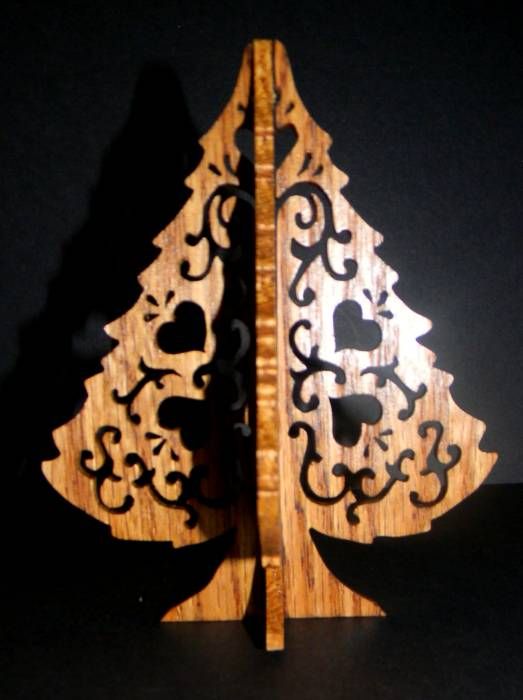
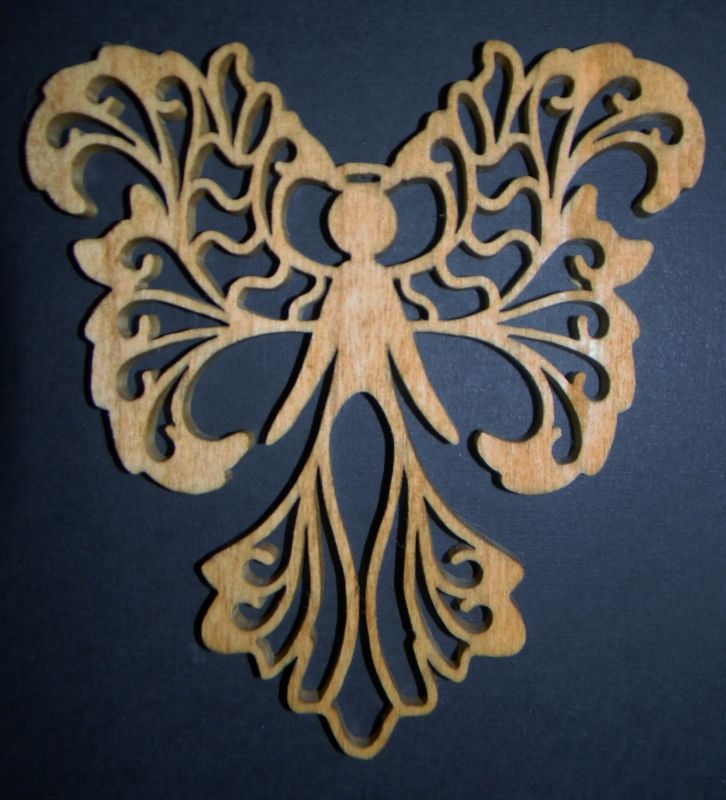
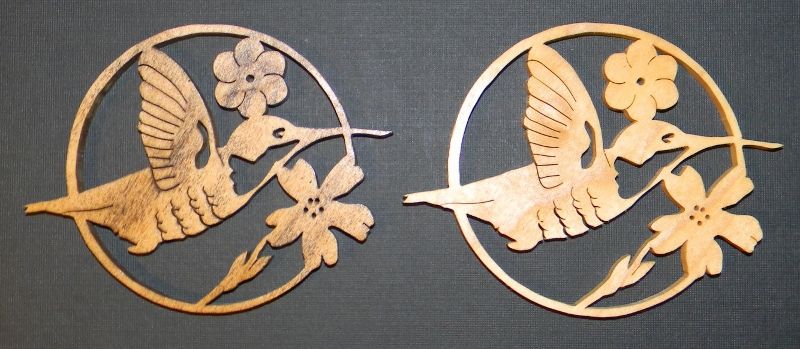
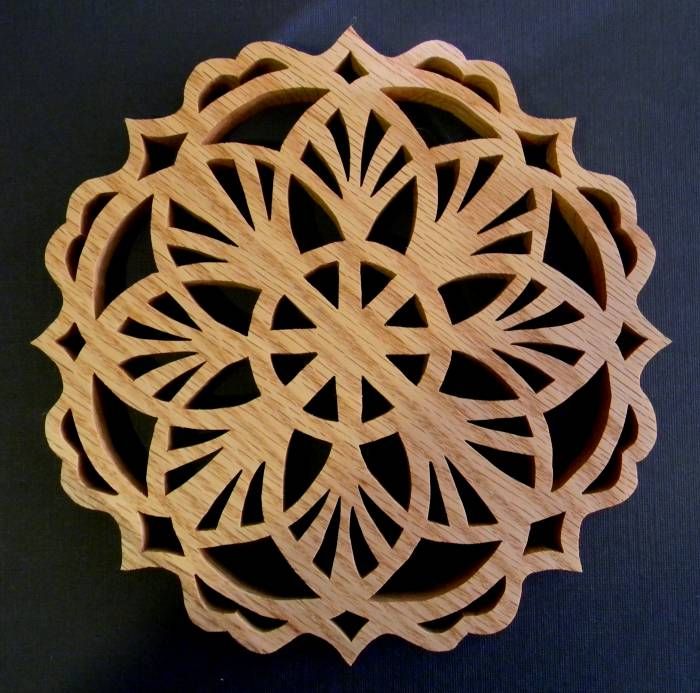
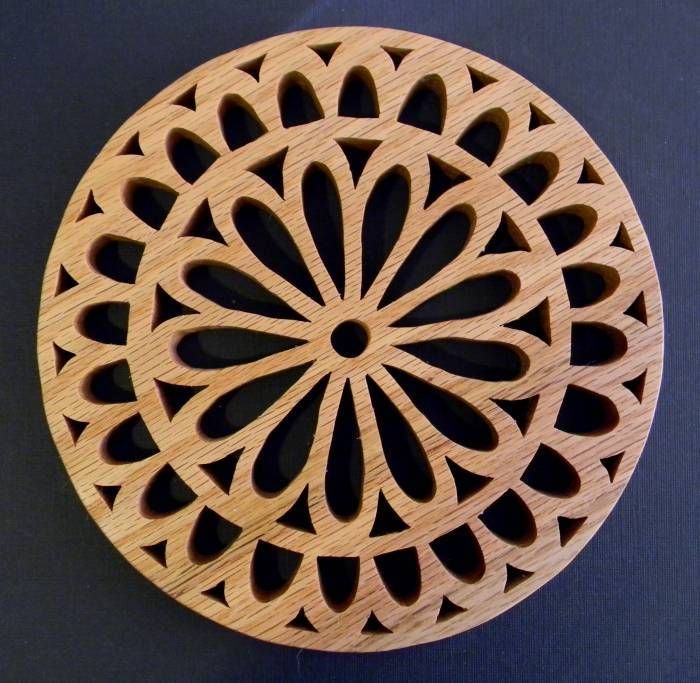
The second ornament today I found in a magazine. In fact is is the magazine from the website above. I love that the magazine is full of success stories, articles, and a wealth of ads for useful woodworking products, BUT, you knew there would be a but, I would be lying if I didn't tell you I love that magazine for the pattern! My ornament is cut from red oak, finished in golden pecan, and is about 5 inches tall.


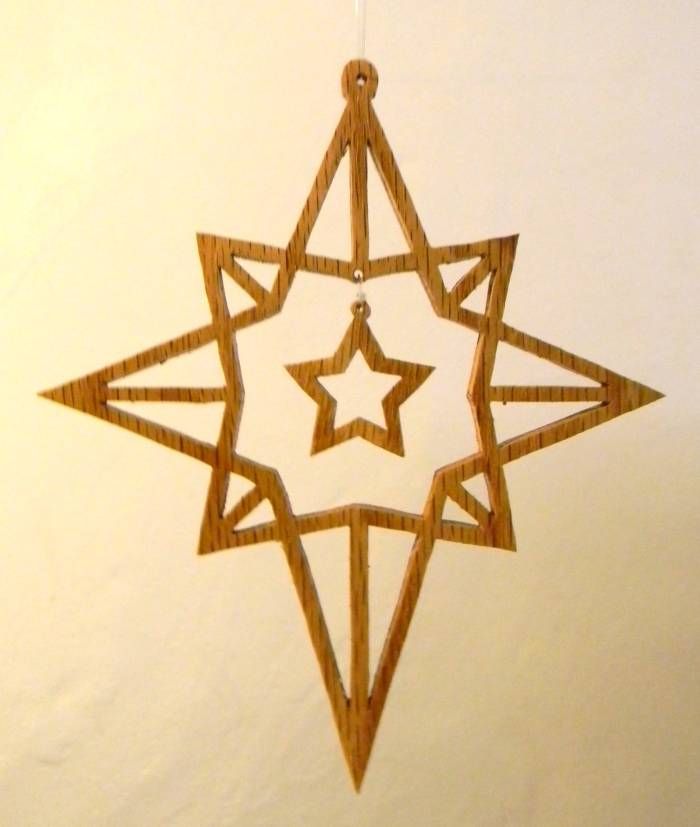
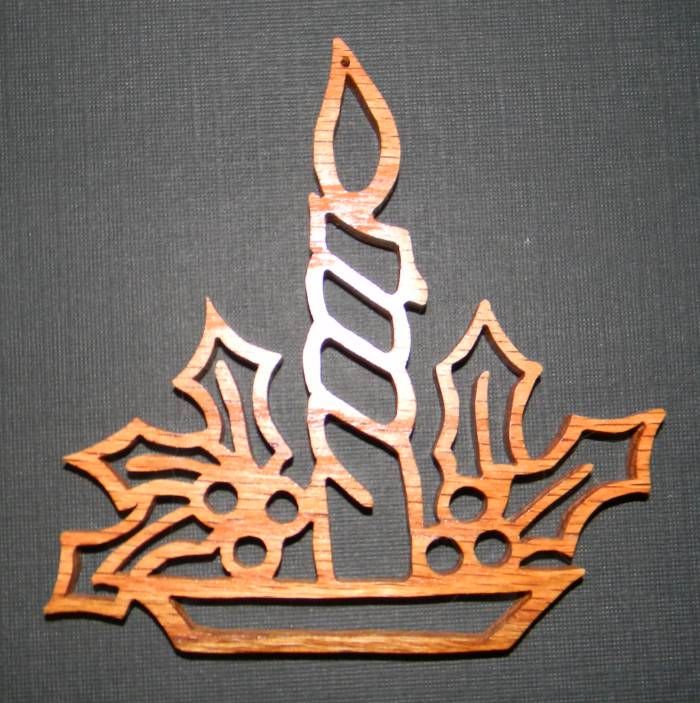
One last ornament today is not exactly 3d but rather one that has a little movement to it. The pattern for this called it a "mobile," but I re-sized it so that it could me an ornament. This ornament has a star suspended within another star. It posed a challenge for me but I love a challenge. I found this at an on-line site called Scroll Saw Village. Here is the direct link to the pattern. My ornament is 6 inches tall, cut from red oak, finished in natural stain.


The star on the inside moves back and forth and is suspended there with fishing line.  I tried other things like a metal jump ring but either they were not small enough to go through that very small hole I drilled or they were not a large enough jump ring to go through the 1/4 inch wood.  (See Challenges!  The other challenge was cutting that very small star.)

That is the end of my ornaments for this Christmas season. I am sure there will be more ornaments made but for now I am moving on to a few scroll sawed gifts.

Happy Crafting ! ! !

Brenda


Monday, November 26, 2012

Traditional Icons in Ornaments

Today I am going to post a few of the traditional icons of Christmas for little ones.  While I am typing this post I am humming "Here Comes Santa Clause"

Santa, aside from baby Jesus, has to be the most recognized Christmas symbol.  He hasn't been lost on the 50 year old!  I have been cutting a few the Jolly Old Man, along with a few other Christmas favorites.

Here are the Santa ornaments that I have busy with.

The first one is the very first ornament that I cut out.  I have cut about 10 of these out this year:


The next one shows Santa as the "Star of Christmas" for the little ones:


And then of course you have the Jolly Old Santa delivering his gifts:


One last ornament today is that filled stocking!  Every child loves getting it and some of the best gifts are the small ones that Santa leaves in the stocking!


My next set of ornaments will be the 3d ones instead of the flat ones.  Everyone has to have a little dimension on the tree.

Happy Crafting ! ! !

Brenda

Wednesday, November 21, 2012

Angels For The Tree

Today is all about the angel ornaments I have made. I think that there must be thousands of different angel patterns available for the scroll saw. I only wish there was more time to cut more of these before Christmas.

I've had a lot of people ask me if I could make them one or more of them.

There are wall plaques, ornaments, fretwork, intarsia, and compound angels. I made several of each of these angels this year. Mine are all ornaments and done in fretwork. I cut 3 or more of each of these. I have 4 or 5 more ready to cut but time is getting away from me and I had to stop cutting so many ornaments and get back to the items that I need to complete for gifts.

For these angels, I used 1/4 inch red oak and the average size of them are 4 to 6 inches tall. They are finished with golden oak, pecan, and natural finishes.

The very first angel that I completed is this one:


I fell in love with her and just had to cut several. That was before I started finding all of these other angels! I found them in magazines, books, and on-line.

Here are several that I found in a Scroll Saw Magazine. There are several more of these filigree angels but these are the ones that I liked the best:

The first one is the only ornament that I cut using Poplar wood.  The grain is not as visible as with red oak but the wood is sturdier.  


This one and the ones to follow are more of the red oak.


This last one I revamped the pattern because I, personally, thought that she looked like she had a set of arms that went up and legs that went down, and then her skirt came from between the legs. I thinned the wing so that it no longer looks like arms going up, lowered the head, and make what originally looked like legs be the arms and she looks more balanced to me. I like the end result:


And finally this angel is by far may favorite of all of the ones I have cut. I am not sure if it is the double heart that I like or if it is her delicate features and double ruffled skirt.


As I finish other angels I will post them but this is all I am planning on making for this holiday season.

Happy Crafting ! ! !

Brenda


Monday, November 19, 2012

Let It Snow - Snowman Ornaments


I said in my last post that the last two snowflakes would be a hint as to the next post. SNOWMEN!

I have several people on my Christmas List who decorate with or collect snowmen. I can use these as a decoration on a package (as with all of the ornaments that I have made this year)in place of a tag. Since these are thin I can include them in a card that I mail. I can also give these as a gift or as a party favor. The possibilities with the ornaments are endless.

There are hundreds of snowmen patterns out there to purchase or swap if you have a friend who designs patterns.

I love the snowmen because they are a winter decoration and not limited to just Christmas. They can be left out longer than a Santa decoration.


I hope you enjoy decorating for the holidays.

Next post will be more ornaments to celebrate the season!

Happy Crafting ! ! !

Brenda

Friday, November 16, 2012

Symbols of Christmas

Today I am sharing some of the ornaments that remind me of Christmas. I know there is the nativity, the tree, stars, and so many other icons that scream Christmas but these are the ones that remind me of my childhood.

There is the traditional Christmas Candle. I can remember my mom loading all of us up in the car and we would drive around town and look at the beautiful Christmas decorations on the town's people houses and in their yards. I loved the single candles perched in each window of many of the houses.

So for all of those who put the "Light Of Jesus" in the windows, this is in your honor.


Then there was the traditional Christmas Cookie baking day. Mom would get everything organized and allow me to bake and decorate cookies for not only our cookie jar but to give as gifts. The tradition of the Gingerbread Man brings back many memories and smiles.


The last 2 for today brings wishes for the upcoming Christmas season. There is something magical about wanting and wishing for a white Christmas, the snowflake. This also brings memories of Christmases that we woke to a fresh blanket of white glistening snow or watching "White Christmas" on TV. I can still hear the old saying that no two snowflakes are a like.


Those last 2 will also bring on the next posts themed ornaments.

Happy Crafting ! ! !

Brenda

Wednesday, November 14, 2012

Time for Christmas Ornaments

I was sitting here looking at all of the pictures of the ornaments that I have made and trying to figure out how to present them here on my blog.

I have decided that I would group them according to theme.

Today I will be sharing my ornaments that are not necessarily just for Christmas or what I call alternative ornaments.

The first one I made in memory of my dad. He loved hummingbirds and I made 2 of these. One I took out to his grave and hung it from the flowers that my mom had put in the vase. Dad was the one who got me interested in the woodworking. Then my son came to me and asked if he could have the other one for his mother-in-law, and I allowed him to have it.


The next one I did for my husband and son who love to fish. Both of them like putting items on the tree that interests them. When I gave my husband his, he made the comment that it looked like a tree instead of a fish. I had to laugh but he was right, if you hold it at just the right angle it does look like a tree!


Then the next 2 ornaments that I am sharing today were part of an ornament swap that I did with long-distance girlfriends. My one friend, Jessica, who lives in California decorates for the holidays with mice. I made her 2 ornaments because the first one I didn't like after I made it but didn't want to throw it away either. The 2nd one looks like a Christmas ornament because the mouse is holding an ornament.


Then there are a couple of very special ornaments that I want to share. The first one is for my mail carrier. This man goes out of his way to make sure that our mail is safely in our box and the top is closed. We can always tell when Ed, the mailman, is having a day off! For him I spent time making a stamp with a mailman inside the stamp. He will receive this and a small box of cookies.


One last ornament for today.... the school mascot. It is special indeed! A tribute to the Jerseyville Panthers!


So in the next few days I will post a few more Christman ornaments that are more traditionalin theme. I am starting to get into the Christmas spirit.

Happy Crafting ! ! !

Brenda

Wednesday, November 7, 2012

Last Trivet For Now

I have so many other things to share that I have made and am making that after this post I will be sharing my Christmas ornaments.  But first one last trivet.

I was approached by a very dear friend to make something, anything for a benefit auction to help a local young man that has a brain tumor.  I thought about it and decided to make a "dog and butterfly trivet" for the silent auction. 

Here is the finished piece.  Like the last trivet that I shared, I rountered the upper edge so that it has a rounded finished look.


I am praying for a cure for this great young man.

I also that by sharing this with you that it inspires you to reach out and help others.  God gives us these talents for a reason.  I only hope that I am using my talent the way God wants me to.

Happy Crafting ! ! !

Brenda

Monday, November 5, 2012

Only 2 Trivets Left To Share

This is the next to the last Trivet that I will be sharing for awhile.

This one also has my first attempt at using a router. I am all for trying new and different things. I love the rounded edge that the router provides that I could not get my sanding alone.

The pattern for this came from an internet site called:  Free Scroll Saw Patterns by Arpop This site is full of free downloadable patterns. 

Here is the wooden trivet that I made using one of his trivet patterns:


Here is a closer look at that routered edge that I talked about before:


There is only one more trivet left this round and then I am moving on to so me of the Christmas ornaments that I am making!

Happy Crafting ! ! !

Brenda

Friday, November 2, 2012

Trivet - Also From An Ornament Pattern

This is one of my favorites that I have made so far. The pattern came out of a book called "Holiday Ornaments for the Scroll Saw." So you can see where this is going, right? The difference is that I did not make any changes to this pattern. I just made it bigger!

The book is evidently an out of print book. I found the book at my local library but fell in love with the patterns. I did a little research and could find it on Amazon BUT the prices for this out of print book there range from $46 to $225, which I personally think is outrageous but I am sure there are people out there that would pay that if they wanted it bad enough. I took a second route in finding the book and decided to check out eBay. I got it for a mere $9.95 plus $3.95 shipping, which was less than the original price of the book.

Here is the finished trivet:


Like I said this is my favorite to date.

Happy Crafting ! ! !

Brenda

Wednesday, October 31, 2012

More Wooden Trivets

This trivet has also been made as a Christmas Gift.

I purchased a set of "Iron Works Ornaments" from Scroller On-Line but didn't like them for ornaments and decided to change it slightly in order to use it as a trivet pattern instead. So I made sure that the pattern was uniform all the way around. I deleted the hanger hold and added a triangle shape to match the other cut outs. I was pleased with the end results.

You can see a picture of the original "ornament" by clicking the above link. Here is a picture of the altered pattern:


Here is a picture of the finished trivet:


I was surprised by the variations of color in this piece of red oak.  I used a butcher block stain on it so that it can be used in the kitchen and be food safe.

Thanks for taking time to look at my work and visit my site.

Happy Crafting ! ! !

Brenda

Thursday, October 25, 2012

I Am Very Honored

Recently I noticed on the Fantabulous Cricut Challenge Blog that they were doing a challenge for farm animals so I entered my farm animal birthday banner into the mix for that week's challenge. I made the top 5!

I have to admit I do not know how to OR where to display the "blinkie" they gave me. If I could figure it out I certainly would display it.

Here is a link back to the Birthday Banner and here is one to the Fantabulous Cricut Challenge Blog where I won!

If anyone knows how to display that "blinkie" and cares to leave me a comment on how do it I would appreciate the help! (Computer savvy I am not!)

Happy Crafting Everyone!

Brenda

Monday, October 8, 2012

Another Of Many Wooden Trivets

I've been back in the wood shop making more Christmas Gifts.

A friend of mine seen these and said, "they are to pretty to set a hot pan on. If I get one I think I will hang it on the wall"

To that I said I don't know why you could not do both. Use it for it's intended purpose and/or for a decoration.

This patten also came from my Cricut. It is from "Paper Lace."

Here us a picture of the pattern:


This pattern, as in the ones I have used from Cricut before, has also been altered. At 12, 3, 6, and 9 o'clock on the pattern's 2nd outer layer, was a three point tulip that, I felt, threw off the design, so I hid the contour on my Cricut Design Studio, and cut the design without those "flowers" in the pattern. Then I took on of the arch cuts, put in into the space, traced, and cut another arch into the pattern so that it was fluent.

My only challenge to cutting this on the scroll saw was that the small triangles on the outer most ring were fairly small. The smallest cuts that I have done to date. The more of them I cut the more nature the cuts became and the easier it was to do.

Here is a picture of the finished Wooden Trivet:


I am very pleased with the way this turned out.  The cuts are improving with practice and time.

Happy wood working ! ! !

Brenda


Monday, October 1, 2012

Challenge Completed


I love challenges. I belong to a scrapbooking message board where each month we post one challenge and then if we can we do something to meet that challenge and post our results.

The challenge this time was to use at least one thing or multiple things that we have purchased but have not used or rarely use. This was a great challenge because I have a ton of things that I loved when I seen them but then got them home and put them on the shelf and never touched them.

Here is my completed challenge item:


I made a card using the following items that were previously purchased and not used or rarely used:

Santa Stamp (never used)
Copic Markers (rarely used)
Stickles (Glitter) (rarely used)
Liquid Applique (rarely used)
Nails Heads (rarely used)
Paper Flowers (rarely used)

Half Pearls (rarely used)
2 Printed Papers (never used)
Shimmer Lime Green Cardstock (never used)
Heat gun (rarely used)

Here another view so that you can see some of the details.


I made a few of these while I was at it (to save time later.)

Happy Scrappin' ! ! !

Brenda