My Family Scrapbook

Monday, September 9, 2013

A New Love In Wood

I have said many times that I like finding a new and unique woodworking pattern.  Not so difficult that I get frustrated but something that makes me say, "I love that!"

I wanted to make a few more gifts that would "wow" people but still not take weeks to make.  I found what I was looking for with a designer named Diana Thompson. She has a site called Scroll Saw Inspirations.  That site some of her patterns for sale.  I also found that she has book published in the scroll saw family.  I was so impressed with her flowers that I had to try my hand at make them.  I bought several of her patterns hoping that they were easy to make yet had that "wow" factor that I was looking for.  Her patterns did not disappoint!

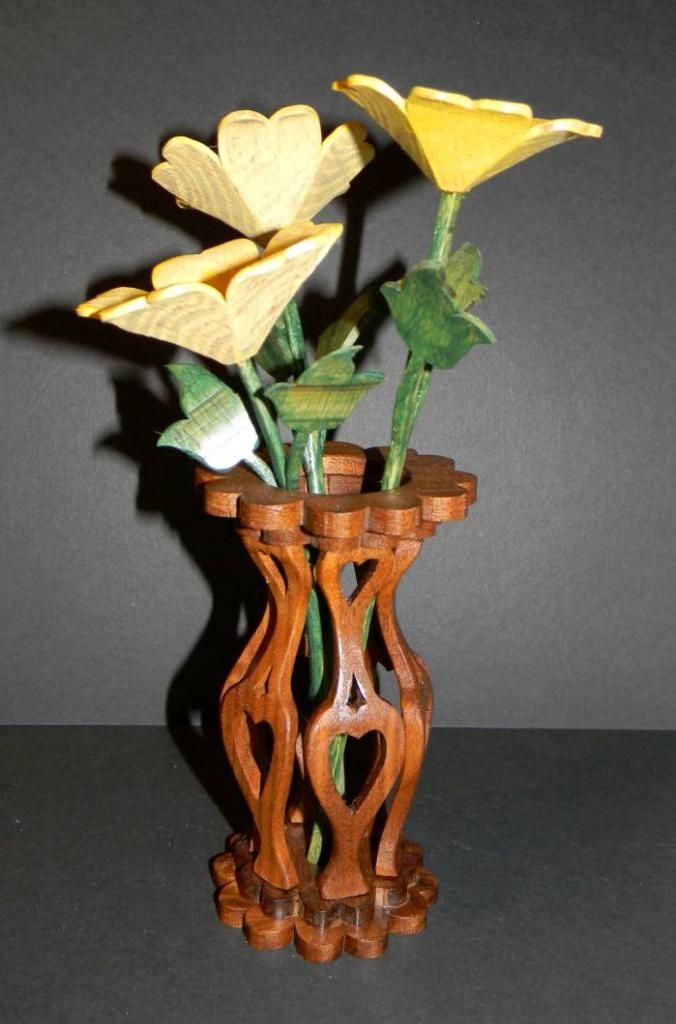
I started with the "Vase of Valentine Flowers" pattern.  I carefully chose my wood and went to work.

I used walnut for the vase and oak for the flowers.  I also chose colored wood stain instead of paint.  That way the grain of the wood is still visible so that people could see that they were indeed made of wood.

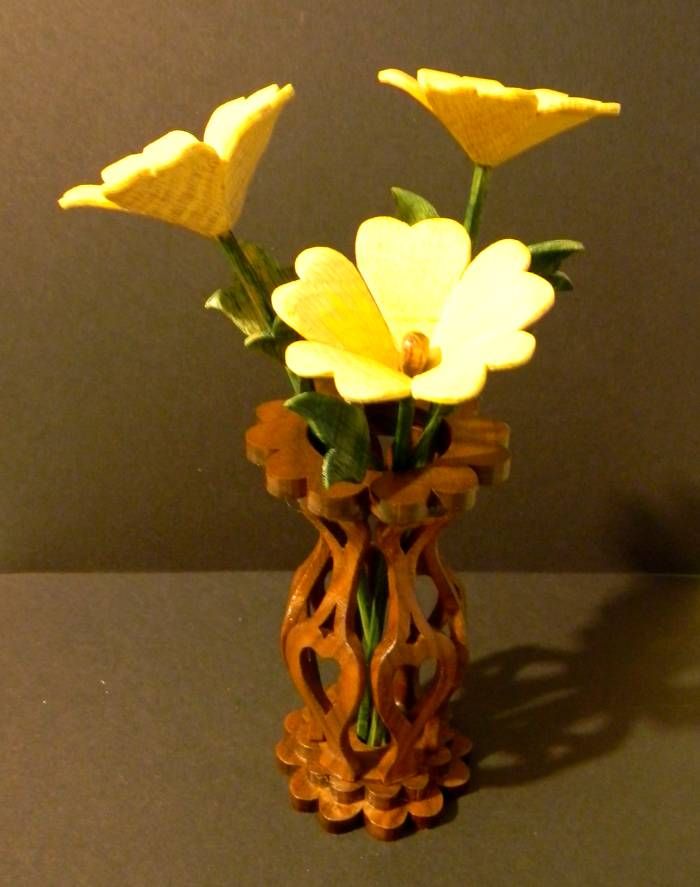
Here is my end results:


And here is a couple of close ups of the flowers:


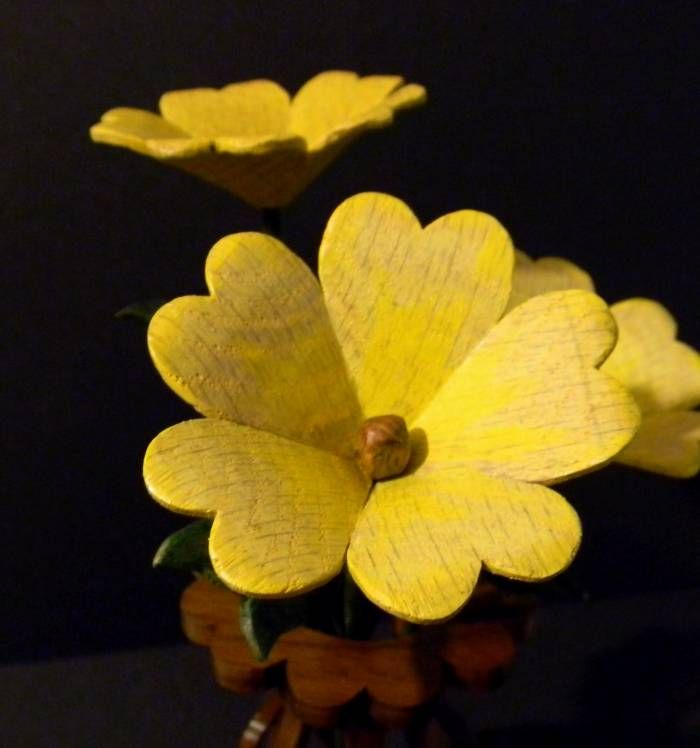
Every component of this project is wood (even the stems and they are also hand cut.)  I had a few issues putting those petals together and this was certainly a lesson in compound cutting. Later I found out some tips and tricks for putting those pieces together.  I loved doing this project so much that I went back to the site and bought almost every flower/vase pattern the woman has to offer on her site.  

I can't wait to try more of these unique flowers and vases.  

Happy Sawing  ! ! !

Brenda

Monday, September 2, 2013

Sometimes Bad Is Good

Mistakes happen when you are crafting.  Those mistakes can either ruin an item or make it look totally different than what was expected or desired.  This is one of those instances.

I love using different colors of stain on my wooden projects.  I am not much on painting them.  I love the look of natural grains and the earthy brown tons of stain.

My husband had just brought home a new color of stain called 'Early American.'  He explained that this stain darkens the grain of the wood but is lighter everywhere else on the wood.  He said he was going to use it on one of the necks of his guitars.  He convinced me to try it.  I had two projects completely cut out, glued, and sanded that were ready for finishing.

I was horrified when I dipped the piece in the stain and it turned the entire piece very dark, almost black.  I thought I had ruined the little boxes.  My saving grace was that these boxes were made from scrap wood and I was only out my time.  I just set them aside and figured I would do one of two things with them, either paint them or throw them away.  I decided to try to salvage them first.

I waited to the stain to dry and then decided that I would try to knock off some of the dark stain with my new sanding mop.  I was pleasantly surprised that the sanding mop was pretty easy on the detailing of the basket box and left an antique look to the piece.

Here is a couple of pictures of the end result:


Then there was also a square box that I also had ruined with this stain.  I used just a regular orbital sander on the sides of this one.  Here is the end results of that box:


This box actually looks like it is made from different types of wood.

These two projects were rescued and I am thankful that my time was not wasted.  I am also thankful that I was no too hasty in throwing them away.

I guess this is where I ask you have you made any artful mistakes lately and how did you fix them ?

Happy Crafting ! ! !

Brenda

Monday, August 26, 2013

I Am A Winner. Jersey County Fair!!!!

In life there is always a story to tell.  My life is no different.  This story will forever make me smile.

I have several hobbies.  One of which is my scroll saw cutting.  I love to make new and different things.  He also has a very creative side.  His hobby is making Cigar Box Guitars and odd string instruments.  This hobby is new to him but he loves doing it.  He has even sold a few of them.

I have been busy making a few gifts for the upcoming Christmas season.  A very dear friend of mine asked me to see what I had been creating.  After showing him, he said that I should enter some of my art in the local county fair.  In the past I had heard people talking about entering various items in the fair but I had never went out and walked through the exhibit barn to look at what was there.  I was always more interested in the food!  He explained a little more about the process to me and convinced me to enter a few of my hand made items.

On the day that I had to take my entries to the fairgrounds I turned to my husband and said, "Grab a couple of your guitars and perhaps there will be a category for you to enter."  He laughed at me and said, "Seriously?"  Never kid a kidder!

We went to the fairgrounds only to find out that we would be competing against one another.

I entered my Fancy Angel and Round Basket into the 'made of wood' category and then my original square basket with the Celtic braid handle into the miscellaneous category.  Joe entered 2 of his guitars in each of the same  categories.

He beat me for the first place ribbons in both!  I got a 2nd place and a 3rd place ribbon in the 'made of wood' category and didn't place at all in the miscellaneous.

Here are photos that he took of our items on display at the fair:


Coming home from picking up our winnings my husband pats me on the shoulder and tells me, "Thank you for the blue ribbon because you were the one that got me to enter."  Yes, I was thinking, that could have been my blue ribbon!

We had a great time and learned a lot about entering items and the different categories that are there.  We are both looking forward to next year!

Have you ever entered items into your county fair?

Happy Crafting ! ! !

Brenda

Monday, July 8, 2013

Fancy Little Angel

I love finding patterns for wood projects in the most unlikely places.  This pattern came from a scrap booking die that I own.  I cut one of these out of black card stock, scanned it with my computer, saved it, re-sized it using Adobe Photo Shop, and then printed it so that it was approximately 6 inches tall.

This was supposed to be done last Christmas and if you read my last post you know that it was cold in my workshop and I stopped sawing as soon as I had enough for my gift giving needs.

This one is for me to keep.


She was a lot of work with all of those little cut outs but the effort was well worth the end result.

I have started to play with computer font (dingbats) to make some more patterns for the upcoming Christmas season.

Find inspiration in out of the way places.

Happy Crafting ! ! !

Brenda

Monday, July 1, 2013

Unfinished Projects Being Finished

Christmas 2012 was my first flurry of making ornaments.  When I had completed enough to give to family, co-workers, and friends I stopped.  I still had 3 ornaments prepped and ready to cut out but just didn't have the desire to be in the garage cutting wood when the weather had turned so cold. 

I have been working on those uncompleted ornaments and slowly getting them from the unfinished pile to the finished pile. 

Here is the last of the filigree angels:


I put kept setting this angle aside because I felt like there was something "dark" or "Gothic" about her.  I know that is really not the case but she was not as inviting as the rest of the patterns that she came from.  She is now finished. 

I had a friend of mine, who is in a nursing home doing rehab, ask is she could have this angel.  Donna said that she loved having the angel that I gave her at Christmas time hang above her bed.  One of her aides knocked it off and when it hit the ground she broke.  Donna said she always feels like the angel watches over her.  So this little girl is now watching over Donna as she does her rehab and works her way home.

Make someone happy and make a little something just to give away.

Happy Crafting ! ! !

Brenda

Monday, June 24, 2013

Back To Wood And An Original Basket

Now that spring is here and I can be in the garage without freezing I have been busy sawing again.  I didn't actually start this project at the saw though.  I put pen to paper and designed this one myself.  It  is somewhat rough in the aspect that because I drew this pattern myself, it is not perfect.  I did not design it using a computer program (although it probably would have been easier if I had that knowledge.)

The piece went together pretty easy for me but I learned a few things while making this.

First I will share the pictures of the basket:

Front view:


Side view:


And a view to show you that the handle does move:


The finished basket is fairly small.  The finished dimensions are from table to the top of the handle is about 7 1/4 inches tall.... from table to the top of the basket part is 3 1/2 inches tall. the basket is 5 1/4 x 5 1/4 inches square.

At this point I am not sure how to share the pattern with all of you. I can't get the PDF file to copy here.  I am still learning how the "Blog" works.

I hope that this is an inspiration for all of you to try your hand at designing.  The reason that I decided to do this is I could not find a square basket that I liked and could see the basic concept of the design by looking at other patterns.    

Happy Crafting ! ! !

Brenda

Monday, June 17, 2013

Another Card

As with the previous post this card was made as a sympathy card for a co-worker and the idea came from Pinterest.


This card was a bit more complex in the making than the previous one.  For this one I used a diamond punch, a lace border punch, a butterfly die, several embossing folders, Stickles (glitter glue,) and pearls.  I also went a little to the unconventional side of scrap booking and used my sewing machine with a zig zag stitch and white thread.


This card, as you can see in this picture, has layers, texture, and height to it.


The sentiment in this one came from an Internet site.

I really like the way this one turned out and once I got it all laid out and figured out how to hold things into place so that I could sew it, the process was fast and easy.  By the way, the trick to sewing in order that you don't "gum up the needle" on the machine is to place a small amount of adhesive to only the center of each diamond.  That tip works like a charm.

Now that you've seen the scrap lift, and got a tip on how to make the process easier, go try one of these...  just imagine the possibilities with different colors of card stock, mixing and matching.  This could be used for any occasion as well.

Happy Scrappin' ! ! !

Brenda


Monday, June 10, 2013

Card Making

Recently, at work, I had several co-workers lose family members.  I needed tasteful cards to use as sympathy cards.  For ideas I turned to Pinterest for my inspiration.  Anytime I scraplift I try to give credit where credit is due but in this case I never did find the original post so I am just going to say I found the ideas on Pinterest and leave it at that.

I also want to point out that when I scrap lift nothing ever looks exactly like the original because I never have the same materials.  So with that said I will just share the first card.

I used embossing folders, ribbon, brads, a punch, and my computer.


A full front view:


And then the sentiment on the inside of the card:


The sentiment was geared toward the arrangement that the employees went together and purchased and sent to the funeral home, which was a lantern with a flameless candle in it.

This shows you that with the white on white effect that you can make a tasteful handmade card for the most serious occasion.

Happy Scrappin' ! ! !

Brenda.

Monday, June 3, 2013

Going Back

The last project that I shared with you was a ring box. I've learned a lot about making those little boxes since that post.

I have made several more of them and expanded on the sizes, shapes, and even finishing them. I've learned to flock the inside, giving them a felted interior.

Today I am sharing all of the boxes that I've created so far... and there will be more in the future because this is one of the ways that I am using scrap wood.

This is the last box that I shared with you:


That box's interior became this:


Then I expanded into round and square boxes:


As you can also see all are flocked on the inside and each has a unique knob as well.  My compound cutting is also improving with each project that I do.

One last photograph of all of the boxes that I've completed....  I am hoping next round to do a clover, a heart, and I also want to expand and do a few bandsaw boxes.  I have a list a mile long of projects.


Happy crafting ! ! !

Brenda


Thursday, May 30, 2013

Been Busy

As you all know life gets so busy sometimes. Mine is no exception and I tend to forget about my blog when that happens.

My daughter's Senior year of high school has flown by. She is now a graduate.

My nephew had a horrible motorcycle accident. He is going to recover but has a long road ahead of him. I had to shake my head and smile. When I asked him if he was going to ride again his response was "can't wait."

New posts are coming your way. New projects in both paper crafting and wood working.

I am trying to get a few things together and try to post at least once a week.

Stay tuned and keep crafting.

Brenda

Friday, January 11, 2013

Welcoming 2013 And Using What I Have - Small Oval Box


I have learned over the years to never throw away something that might be able to be used. I learned this from my dad, Cecil. We always joked with my dad and told him to "throw that away." His response was always the same, "I might need that someday or worse, you might." He took saving things to the extreme! Although I do not save everything, when I am working with wood and I see a scrap of wood from a scroll cut and I always think to myself, "do I save that or throw it in the kindling pile?"

I love the thought of using odd items or scraps and making them into something. With that thought in mind, my scrap wood pile was getting a bit larger that what I have room to store so I started searching for a project to use some it.

That is when I thought about my Christmas gift from my son. He and his wife, Kim gave me a scroll saw pattern book called "Custom Wooden Boxes For The Scroll Saw." This book has all kinds of wooden boxes for the beginner to the advanced scroller. In that book I found a few small boxes in different shapes that were perfect for the scraps that I wanted to use.

These boxes can be made from any wood and a person can make them in several different ways. I glued scrap boards together to form a block and then cut the rings to form the box sides and a scrap of 1/4 inch scrap cut into an oval formed the box bottom.


The top of the box is formed in the same manner except only one ring is attached to the box top and it is slightly larger than the box rings from the bottom of the box. The knob on the top of the box is a compound cut.


Here are several views of finished box. The first is an angle shot of the box so that you can see that the knob is compound cut.


A side view:


And lastly a front view:


This is a relatively a small piece measuring 3 1/2 inches from the table to the top of the knob and about 3 1/2 inches at the widest part of the oval.

I love the way that the grain in the wood really shows in the ring layers and that each ring (even though the entire box is made of pine and is stained all in the same stain) is a different shade. I was very happy with this project and being able to use some of my scrap wood and turn it into a useful made this project all the sweeter.

I love taking a page out of my dad's book and saving those pieces of wood that are somehow just to big to throw away and then finding a use for them. I also love the fact that this project did not cost me anything to make.

Happy Crafting ! ! !

Brenda